Kubernetes (K8s) is an open-source system for automating deployment, scaling, and management of containerized applications.
Conductor of containers
Provides a declarative way to define a cluster' state
Contains one or more master nodes and worker nodes(can be Physical servers,VMs).The workers nodes contains PODS which contains containers
Each node has a Kubelet to communicate with the master,Container runtime to run containers within the PODs and Kube-Proxy ensures each pod has a IP address
Note: (To use KVM driver for ubuntu 18.04)(https://www.linuxtechi.com/install-configure-kvm-ubuntu-18-04-server/)
Note: sudo minikube start --vm-driver=none for Ubuntu 18.04 minikube version 1.6.2 worked minikube release
To install latest minikube (Linux) Installed Binary
curl -Lo minikube https://storage.googleapis.com/minikube/releases/latest/minikube-linux-amd64
&& chmod +x minikube
sudo install minikube /usr/local/bin/
# To start a local kubernetes cluster Generally run with
# sudo minikube --vm-driver=none if running in host directly not in VM
minikube start
minikube stop # stop a local kubernetes cluster
minikube dashboard # access the kubernetes dashboard running within the minikube cluster
minikube delete # deletes a local kubernetes cluster
minikube start -p <name>' to create a new cluster, or 'minikube delete' to delete this one
minikube status
kubectl version
kubectl cluster-info
kubectl get all # all info about Kubernetes Pods,Deployments,Services, and more
kubectl run [container-name] --image=[image-name] # simple way to create a deployment for a POD
kubectl port-forward [pod] [ports] # forward a port to allow external access
kubectl expose [port] # expose a port for a Deployment/Pod
kubectl create [resource] # create a resource
kubectl apply [resource] # createor modify a resource
kubectl --help
kubectl get pods
kubectl get services sudo minkube dashboard
or
kubectl apply -f https://raw.githubusercontent.com/kubernetes/dashboard/\
v2.0.0-beta8/aio/deploy/recommended.yaml
kubectl describe secret -n kube-systemFrom above command copy the token of type kubernetes.io/service-account-token
kubectl proxyChange (https to http)
to
Service discovery and load balancing
Kubernetes gives Pods their own IP addresses and a single DNS name for a set of Pods, and can load-balance across them.
Storage Orchestration
Automatically mount the storage system of our choice, whether from local storage, a public cloud provider such as GCP or AWS, or a network storage system such as NFS, iSCSI, Gluster, Ceph, Cinder, or Flocker.
Self Healing
Restarts containers that fail, replaces and reschedules containers when nodes die, kills containers that don’t respond to your user-defined health check, and doesn’t advertise them to clients until they are ready to serve.
Automating rollouts and rollbacks
Kubernetes progressively rolls out changes to your application or its configuration, while monitoring application health to ensure it doesn’t kill all your instances at the same time. If something goes wrong, Kubernetes will rollback the change for you. Take advantage of a growing ecosystem of deployment solutions.
Secret and configuration management
Deploy and update secrets and application configuration without rebuilding our image and without exposing secrets in your stack configuration.
Horizontal scaling
Scale your application up and down with a simple command, with a UI, or automatically based on CPU usage.
A Pod is the basic execution unit of a Kubernetes application-the smallest and simplest unit in the Kubernetes object model that you create or deploy.
Pods run containers
Pods acts as a environment for containers.
As a Developer we need to organise the application "parts" into Pods (Server, caching, APIs, database, etc.)
Pod IP, memory, volumes, etc. shared across containers
we can scale horizontally by adding Pod replicas
Pods live and die but never come back to life. New one is created
Pod containers share the same Network namespace(share IP/port)
Pod containers have the same loopback network interfaces(localhost)
Containers processes need to bind to different ports within a Pod
Ports can be reused by containers in separate Pods
Pods never span nodes
Note: Pods have different ips (10.0.0.33, 10.0.0.43)
Use any of the following
kubectl run command
kubectl create/apply command with a yaml file.
  # Run the nginx:alpine container in a Pod
  kubectl run [podname]  --image=nginx:alpine
  kubectl create deployment [podname] --image=nginx:alpine

  # Examples
  kubectl run sample-nginx-alpine-pod --image=nginx:alpine # deprecated
  kubectl create deployment nginx-pod --image=nginx:alpine

  # list only pods
  kubectl get pods
  kubectl get pods --watch
  # list all resources
  kubectl get all
Pods and containers are only accessible within the kubernetes cluster by default
One way to expose a container port externally: kubectl port-forward
Image to run a pod is a docker image
    # Enable Pod Container to be
    # called externally
    kubectl port-forward [name-of-pod]  external_port:internal_port
    kubectl port-forward pod/nginx-pod-6fc99f67cd-h4zxr  8001:80
    # 127.0.0.1:8001 to access the application

    # will cause pod to be recreated
    kubectl delete pod [name-of-pod]
    kubectl delete pod nginx-pod-6fc99f67cd-h4zxr

    # Delete Deployment that manages the pod
    # use kubectl get all to get deployment name of the pod
    kubectl delete deployment [name-of-deployment]
kubectl delete deployment nginx-podkey: value
complexMap:
key1: value
key2:
subKey: value
items:
- item1
- item2
itemsMap:
- map1: value
map1Prop: value
- map2: value
map2Prop: valueapiVersion: v1
kind: Pod
metadata:
name: my-nginx
spec:
containers:
- name: my-nginx
image: nginx:alpine# perform a trial create and validate the YAML (validate true is default)
kubectl create --filename file.pod.yml --dry-run --validate=true
kubectl create -f nginx.prod.yml --dry-run --validate=true
# Create a Pod from YAML
# Will error if Pod already exists
kubectl create -f file.pod.yml
# altenative way to create or apply changes to a
# Pod from YAML
kubectl apply -f file.pod.yml
kubectl apply -f nginx.prod.yml
# above command creates a warning
# use --save-config when you what to use
# kubectl apply in future
kubectl create -f file.prod.yml --save-config # Store current properties in resource's annotations--save-config causes the resource's configuration settings to be saved in the annotations.Having this allows in-place changes to be made to a Pod in the future using kubectl apply
kubectl edit or kubectl patch can also be used to change small or subset of changes to a Pod.
# delete a Pod
kubectl delete pod [name-of-pod]

# delete Pod using YAML file that created it
kubectl delete -f file.pod.yml
kubectl delete -f nginx.prod.ymlapiVersion: v1
kind: Pod
metadata:
name: my-nginx
labels:
app: nginx
rel: stable
spec:
containers:
- name: my-nginx
image: nginx:alpine
ports:
- containerPort: 80Note: labels are used in deployments
kubectl create -f nginx.pod.yml --save-config
# shows output in YAML this is because of --save-config(added annotations to the o/p)
kubectl get pod my-nginx -o yaml
# To troubleshoot the Pod this output is useful
kubectl describe pod [pod-name]
kubectl describe pod my-nginx
kubectl apply -f nginx.pod.yml
# to go into pod with interactive shell
kubectl exec [pod-name] -it sh
kubectl exec my-nginx -it sh # enter exit the shell
kubectl edit -f nginx.pod.ymlkubectl port-forward my-nginx 8001:80if you're running the none driver, you'll need a whole host of dependencies that kubernetes requires: docker, iptables, socat, certain kernel modules enabled, etc
sudo apt-get install socat # fixed the issue.
How to check the health of the probe.It depends on the container applications.We can execute direct actions on probes.Some of them are
Sample Requirements
apiVersion: v1
kind: Pod
metadata:
  name: my-nginx
  labels:
    app: nginx
    rel: stable
spec:
  containers:
  - name: my-nginx
    image: nginx:alpine
    ports:
    - containerPort: 80
livenessProbe:
httpGet:
path: /index.html
port: 80
initialDelaySeconds: 15
timeoutSeconds: 2 # default is 1
periodSeconds: 5 # Default is 10
failureThreshold: 1 # Default is 3 apiVersion: v1
kind: Pod
metadata:
name: busybox-liveness-pod
spec:
containers:
- name: busybox-liveness-pod
image: k8s.gcr.io/busybox
resources:
limits:
memory: "64Mi" # 64 MB
cpu: "50m" # 50 millicpu (.05 cpu or 5% of the cpu)
args:
- /bin/sh
- -c
- touch /tmp/healthy; sleep 30; rm -rf /tmp/healthy; sleep 600
livenessProbe:
exec:
command:
- cat
- /tmp/healthy
initialDelaySeconds: 5
periodSeconds: 5The above one results in creation of new pods by deleting old pods after 30 seconds as /tmp/healthy file is removed.THis is repeated for new pods as well for this Pod created using above YAML file.
    apiVersion: v1
    kind: Pod
    metadata:
      name: my-nginx
      labels:
        app: nginx
        rel: stable
    spec:
      containers:
      - name: my-nginx
        image: nginx:alpine
        ports:
        - containerPort: 80
        readinessProbe:
          httpGet:
            path: /index.html
            port: 80
          initialDelaySeconds: 2
          periodSeconds: 5
Indetion is very important in YAML file. If any there is a problem it may result in unknown validation field error
Health checks provide a way to notify Kubernetes when a Pod has a problem
A ReplicalSet is a declarative way to manage Pods.
A Deployment is a declarative way to manage Pods using a ReplicaSet.
Deployments and ReplicaSets ensure Pods stay running and can be used to scale Pods.
    apiVersion: apps/v1 # Kubernetes API version
    kind: Deployemnt  # Resource type
    metadata: # Metadata about the Deployment
    spec:
      selector: # Select Pod template label(s)
      template: # template used to create the Pods
        spec:
          containers: # Containers that will run in the Pod.
          - name: my-nginx
image: nginx:alpineKubernetes API version and resource type(Deployment)
Metadata about the Deployment
The Selector is used to "select" the template to use(based on labels)
Template to use to create the Pod/Containers(note that the selector matches the label)
  apiVersion: apps/v1
  kind: Deployment
  metadata:
    name: frontend
    labels:
      app: my-nginx
      tier: frontend
  spec:
    selector:
      matchLabels:
        tier: frontend
    template:
      metadata:
        labels:
          tier: frontend
      spec:
        containers:
        - name: my-nginx
          image: nginx:alpine
          livenessProbe:
            httpGet:
              path: /index.html
              port: 80
            initialDelaySeconds: 15
            timeoutSeconds: 2
            periodSeconds: 5
failureThreshold: 1 # Create a deployment
kubectl create -f file.deployment.yml
# Alternate way to create or apply changes to a
# Deployment from YAML
kubectl apply -f file.deployment.yml
# Use --save-config when you want to use
# kubectl apply in the future
kubectl create -f file.deployment.yml --save-config
# List all deployments
kubectl get deployments
kubectl get deployments --show-labels # Deployments and their labels
# get all deployments with a specific label
kubectl get deployments -l app=nginx
# Delete Deployment (All associated Pods/Containers)
kubectl delete deployment [deployment-name]Update the YAML file or use the kubectl scale command
    # Scale the Deployment Pods to 5
    kubectl scale deployment [deployment-name]  --replicas=5

    # Scale by referencing the YAML file
    kubectl scale -f file.deployment.yml --replicas=5

    spec:
      replicas: 3
      selector:
tier: frontend kubectl create -f nginx.deployment.yml --save-config
kubectl describe deployment my-nginx
kubectl get deploy
kubectl get deployment
kubectl get deployments
kubectl get deployments --show-labels
kubectl get deployments -l app=nginx
kubectl scale -f nginx.deployment.yml --replicas=3
kubectl delete -f nginx.deployment.yml apiVersion: apps/v1
kind: Deployment
metadata:
name: my-nginx
labels:
app: my-nginx
spec:
replicas: 2
selector:
matchLabels:
app: my-nginx
template:
metadata:
labels:
app: my-nginx
spec:
containers:
- name: my-nginx
image: nginx:alpine
ports:
- containerPort: 80
resources:
limits:
memory: "128Mi" # 128 MB No spaces between 128 and Mi
cpu: "200m" # 200 millicpu (0.2 cpu or 20% of the cpu)If our applications contains 3 replicas of appV1 and if we want roll to appV2, here new pods with appV2 are created one by one and after successful creation of one Pod then one of old pod is removed and this repeated until all desired nodes are created.So there zero downtime in the application.
Update a deployment by changing the YAML and applying changes to the cluster with kubectl apply
    # Apply changes made in a YAML file
    kubectl apply -f file.deployment.yml

    apiVersion: apps/v1
    kind: Deployment
    metadata:
      name: node-app
    spec:
      replicas: 2
      minReadySeconds: 10
      selector:
        matchLabels:
          app: node-app
      template:
        metadata:
          labels:
            app:node-app
        spec:
          containers:
          - image: node-app:1.0
            name: node-app
            resources:
Note: minReadySeconds: 10 # waits 10 seconds after container is started ensuring it didnot crash in first 10 seconds to get the traffic
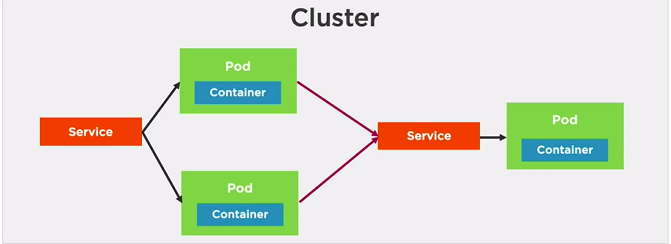
We can't rely on IP address of Pods because these change a lot.So we need need services since Pods may only live for a short time.
Also Pods can be horizontally scaled so each Pod get its own IP address.
A Pod gets an IP address after it has been scheduled(No way for clients to know IP ahead of time)
Note: Once the connection to Pod is established all the user requests will come to this Pod if it is alive.
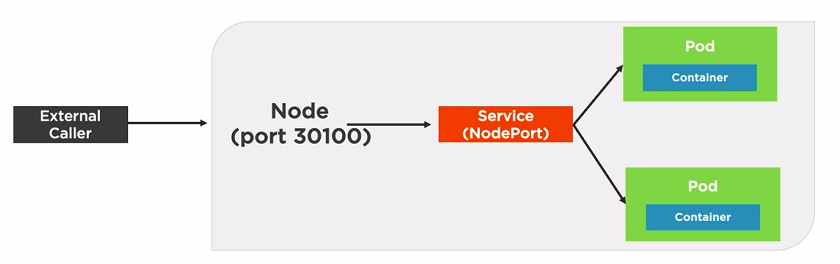
Helpful for testing to reach a particular Pod using NodePort Service.
# Listen on port 8080 locally and forward to port 80 in Pod
kubectl port-forward pod/[pod-name]  8080:80

# Listen on port 8080 locally and forward to
kubectl port-forward deployment/[deployment-name] 8080

# Listen on port 8080 locally and forward to Service's Pod
kubectl port-forward service/[service-name] 8080

# Examples
kubectl port-forward pod/node-app-85dcdf447c-mj6sv 8080:8080
kubectl port-forward deployment/node-app 8080
kubectl port-forward deployment/node-app 9000:8080
port-forward is used for debugging and testing
  apiVersion: v1 # Kubernetes API version
  kind: Service  # resource type
  metadata:   # Metadata of the service
  spec:
    type:  # Type of service(ClusterIP,NodePort,LoadBalancer)
           # Defaults to ClusterIP
    selector: # Select Pod template label(s)
              # that service will apply to

    ports: # Define container target port and the
# port for the service apiVersion: v1 # Kubernetes API version
kind: Service # resource type
metadata: # Metadata of the service
name: node-app # Name of Service
# each service gets a DNS entry
labels:
app: node-app
spec:
selector:
app: node-app # Service will apply to the resource
# with a label of app: node-app
ports:
- name: http
port: 8080 # Port of the Service
targetPort: 8080 # Container PortSuppose there are two services with names frontend and backend. Now a frontend Pod can access a backend Pod using a backend:port
    apiVersion: v1 # Kubernetes API version
    kind: Service  # resource type
    metadata:   # Metadata of the service
      name: node-app # Name of Service
                     # each service gets a DNS entry
      labels:
        app: node-app
    spec:
      selector:
        type: NodePort
        app: node-app # Service will apply to the resource
                      # with a label of app: node-app
      ports:
      - name: http
        port: 8080       # Port of the Service
        targetPort: 8080 # Container Port
        nodePort: 31000  # Optionally set b/w 30000-32767
Note: I can access the service using 127.0.0.1:31000 by not localhost:31000(Ubuntu 18.04)
apiVersion: v1 # Kubernetes API version
kind: Service # resource type
metadata: # Metadata of the service
name: node-app # Name of Service
# each service gets a DNS entry
labels:
app: node-app
spec:
selector:
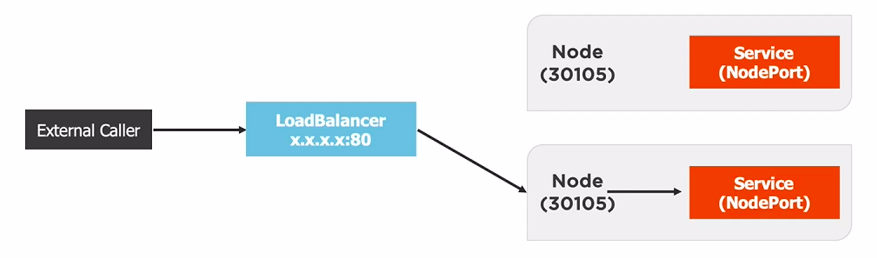
type: LoadBalancer # normally used with cloud providers
app: node-app # Service will apply to the resource
# with a label of app: node-app
ports:
- port: 8080 # Port of the Service defaults to 80
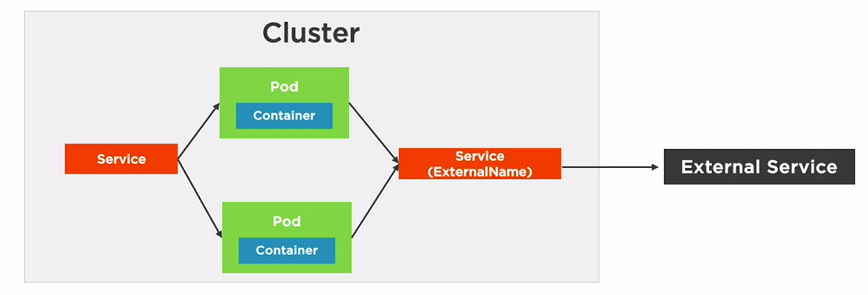
targetPort: 8080 # Container PortOther Pods can use this FQDN to access the external service
Service will proxy to FQDN
  apiVersion: v1 # Kubernetes API version
  kind: Service  # resource type
  metadata:   # Metadata of the service
    name: external-service
    labels:
      app: node-app
  spec:
    selector:
      type: ExternalName
      externalName: api.acmecorp.com
    ports:
- port: 9000 # Port of the Service defaults to 80 # Creates CusterIP if we have not specified type
kubectl create -f file.service.yml
# Update a Service
# Assumes --save-config was used with create
kubectl apply -f file.service.yml
# Shell into a Pod and test a URL. Add -c [containerID]
# in cases where multiple containers are running in the Pod
kubectl exec [pod-name] -- curl -s http://podIP
# Install and use curl (example Alpine Linux)
kubectl exec [pod-name] -it sh
> apk add curl
> curl -s http://podIP apiVersion: v1
kind: Pod
metadata:
name: node-app
spec:
containers:
- name: node-app
image: gireeshcse/node-demo-k8:v3
kubectl create -f standalone.pod.yml --save-config
kubectl get pods
# Output of above command first one is standalone Pod
NAME READY STATUS RESTARTS AGE
node-app 1/1 Running 0 6m9s
node-app-85dcdf447c-mj6sv 1/1 Running 0 108m
node-app-85dcdf447c-x7492 1/1 Running 0 108m
# to Get IP of pod
kubectl get pod node-app-85dcdf447c-mj6sv -o yaml
kubectl describe pod node-app-85dcdf447c-mj6sv
# The above commands output contains
# podIP: 172.17.0.6 # First Command
# IP: 172.17.0.6 # 2nd Command
# open shell prompt in standalone Pod
kubectl exec node-app -it sh
# uname -a
Linux node-app 5.0.0-29-generic #31~18.04.1-Ubuntu SMP Thu Sep 12 18:29:21 UTC 2019 x86_64 GNU/Linux
# curl http://172.17.0.6:8080
Hello World! Version1 -- node-app-85dcdf447c-mj6sv
# clusterIP.service.yml
apiVersion: v1
kind: Service
metadata:
name: nodeapp-clusterip
spec:
type: ClusterIP
selector:
app: node-app
ports:
- port: 8001
targetPort: 8080
kubectl apply -f clusterIP.service.yml
kubectl get services
# Output
NAME TYPE CLUSTER-IP EXTERNAL-IP PORT(S) AGE
kubernetes ClusterIP 10.96.0.1 <none> 443/TCP 71d
nodeapp-clusterip ClusterIP 10.96.251.157 <none> 8001/TCP 52s
# open shell prompt in standalone Pod
kubectl exec node-app -it sh
# curl 10.96.251.157:8001
Hello World! Version1 -- node-app-85dcdf447c-x7492
# curl http://nodeapp-clusterip:8001
Hello World! Version1 -- node-app-85dcdf447c-x7492
kubectl exec node-app-85dcdf447c-x7492 -it sh
# curl http://nodeapp-clusterip:8001
Hello World! Version1 -- node-app-85dcdf447c-mj6sv
kubectl get pods
NAME READY STATUS RESTARTS AGE
node-app 1/1 Running 0 31m
node-app-85dcdf447c-mj6sv 1/1 Running 0 133m
node-app-85dcdf447c-x7492 1/1 Running 0 133m
# Delete the service
kubectl delete -f clusterIP.service.ymlThe above demonstrates pods calling pods. Used for debugging
  # standalone.pod.yml

  apiVersion: v1
  kind: Pod
  metadata:
    name: node-app-standalone
  spec:
    containers:
    - name: node-app-standalone
      image: gireeshcse/node-demo-k8:v3

  kubectl create -f standalone.pod.yml --save-config

  # nodeport.service.yml

  apiVersion: v1
  kind: Service
  metadata:
    name: nodeapp-nodeport
  spec:
    type: NodePort
    selector:
      app: node-app
    ports:
    - port: 8080
      targetPort: 8080
      nodePort: 31000

  kubectl apply -f nodeport.service.yml
  kubectl get services
  # O/p of above command
  NAME               TYPE        CLUSTER-IP      EXTERNAL-IP   PORT(S)          AGE
  kubernetes         ClusterIP   10.96.0.1       <none>        443/TCP          71d
  nodeapp-nodeport   NodePort    10.96.201.120   <none>        8001:31000/TCP   38s

  # Worked for
  http://127.0.0.1:31001/
  # http://localhost:31001 didn't work

  # Delete
  kubectl delete -f nodeport.service.yml
Here it is exposed to the outside the cluster.
  # loadbalancer.service.yml
  apiVersion: v1
  kind: Service
  metadata:
    name: nodeapp-loadbalancer
  spec:
    type: LoadBalancer
    selector:
      app: node-app
    ports:
    - name: "8002"
      port: 8002
      targetPort: 8080

  kubectl create -f loadbalancer.service.yml --save-config

  kubectl get services
  # Output
  NAME                           TYPE           CLUSTER-IP    EXTERNAL-IP   PORT(S)          AGE
  service/kubernetes             ClusterIP      10.96.0.1     <none>        443/TCP          71d
  service/nodeapp-loadbalancer   LoadBalancer   10.96.9.158   <pending>     8080:31309/TCP   3m58s

  # For Docker Destop EXTERNAL-IP of load-balancer will be localhost
  # You can access localhost:8080

  # For Minikube
  sudo minikube service nodeapp-loadbalancer
  |-----------|----------------------|-------------|--------------------------|
  | NAMESPACE |         NAME         | TARGET PORT |           URL            |
  |-----------|----------------------|-------------|--------------------------|
  | default   | nodeapp-loadbalancer |        8080 | http://192.168.1.4:31309

# to access http://192.168.1.4:31309To store application state/data and exchange it between Pods with Kubernetes -- We need Volumes.
A Volume can be used to hold data and state for Pods and containers.
A Pod can have multiple Volumes attached to it.
Containers rely on a mountPath to access a Volume.
Kubernetes suppots:
A Volume references a storage location
Must have a unique name
Attached to a Pod and may or may not be tied to the Pod's lifetime (depending on the Volume type)
A Volume Mount references a Volume by name and defines a mountPath
  apiVersion: v1
  kind: Pod
  metadata:
    name: nginx-alpine-volume
  spec:
    volumes:
      - name: html # Define Initial Volume
        emptyDir: {} # Lifetime of the Pod
    containers:
    - name: nginx
      image: nginx:alpine
      volumeMounts:
        - name: html # Reference "html" Volume
          mountPath: /usr/share/nginx/html
          readOnly: true
    - name: html-updater
      image: alpine
      command: ["bin/sh","-c"]
      args: # updates latest date every 10 sec
        - while true; do date >> /html/index.html;
            sleep 10; done
      volumeMounts:
        - name: html # Reference "html" Volume
          mountPath: /html

  # Commands
  kubectl create -f emptydir.pod.yml --save-config
  kubectl port-forward nginx-alpine-volume 8080:80
2 containers one is creating and other is displaying
    apiVersion: v1
    kind: Pod
    metadata:
      name: docker-volume
    spec:
      volumes:
        - name: docker-socket # Define a socket volume
          hostPath: # on host
            path: /var/run/docker.sock
            type: Socket
      containers:
      - name: docker
        image: docker
        command: ["sleep"]
        args: ["100000"]
        volumeMounts:
          - name: docker-socket # Reference "html" Volume
            mountPath: /usr/share/nginx/html
Valid types include
    #Commands
    kubectl create -f hostpath.pod.yml --save-config

    kubectl describe pod docker-volume
    #Contains following info
    Volumes:
    docker-socket:
      Type:          HostPath (bare host directory volume)
      Path:          /var/run/docker.sock
      HostPathType:  Socket
    default-token-g5sp9:
      Type:        Secret (a volume populated by a Secret)
      SecretName:  default-token-g5sp9
      Optional:    false

    kubectl exec docker-volume -it sh
The volumes key should be at the same level as containers (In deployments file)
    apiVersion: v1
    kind: Pod
    spec:
      volumes:
        - name: data
          azureFile:
            secretName: <azure-secret>
            shareName: <share-name>
            readOnly: false
      containers:
      - name: my-app
        image: someimage
        volumeMounts:
          - name: data # Reference "data" Volume
mountPath: /data/storage apiVersion: v1
kind: Pod
spec:
volumes:
- name: data
awsElasticBlockStore:
volumeID: <volume_ID>
fsType: ext4
containers:
- name: my-app
image: someimage
volumeMounts:
- name: data # Reference "data" Volume
mountPath: /data/storage apiVersion: v1
kind: Pod
spec:
volumes:
- name: data
gcePersistentDisk:
pdName: datastorage
fsType: ext4
containers:
- name: my-app
image: someimage
volumeMounts:
- name: data # Reference "data" Volume
mountPath: /data/storage
# To see info about volumes
kubectl describe pod [pod-name]
kubectl get pod [pod-name] -o yamlA PersistentVolume(PV) is a cluster-wide storage unit provisioned by an administrator with a lifecycle independent from a Pod.
A PersistentVolumeClaim(PVC) is a request for a storage unit (PV).
A PersistentVolume is a cluster-wide storage resource that relies on network-attached storage(NAS)
Normally provisioned by a cluster administrator
Available to a Pod even if it gets rescheduled to a different Node
Rely on a storage provider such as NFS, cloud storage, or other options
Associated with a Pod using a PersistentVolumeClaim(PVC)
    apiVersion: v1
    kind: PersistentVolume
    metadata:
      name: my-pv
    spec:
      capacity: 10Gi
      accessModes:
        - ReadWriteOnce # One client can mount for read/write
        - ReadOnlyMany # Many clients can mount for reading
      persistentVolumeReclaimPolicy: Retain
      # Retain even after claim is deleted
      azureFile:
        secretName: <azure-secret>
        shareName: <name_from_azure>
readOnly: false kind: PesistentVolumeClaim
apiVersion: v1
metadata:
name: pv-dd-account-hdd-5g
annotations:
volume.beta.kubernetes.io/storage-class: accounthdd
spec:
accessModes:
- ReadWriteOnce
resources:
requests:
storage: 5Gi apiVersion: v1
kind: Pod
metadata:
name: pod-uses-account-hdd-5g
labels:
name: storage
spec:
containers:
- name: az-c-01
image: nginx
command: ["bin/sh","-c"]
args: # updates latest date every 1 sec
- while true; do echo $(date) >> /mnt/blobdisk/outfile;
sleep 1; done
volumeMounts:
- name: blobdisk01 # Reference "blobdisk01" Volume
mountPath: /mnt/blobdisk
volumes:
- name: blobdisk01 # Define Volume
persistentVolumeClaim:
claimName: pv-dd-account-hdd-5gapiVersion: storage.k8s.io/v1
kind: StorageClass
metadata:
name: local-storage
reclaimPolicy: Retain # Default delete after PVC is released
provisioner: kubernetes.io/no-provisioner # Provisioner Used to create PV resource
volumeBindingMode: WaitForFirstConsumer
#Wait to create until Pod making PVC is created
#Default is immediate(ceate once PVC is created) apiVersion: v1
kind: PesistentVolume
metadata:
name: my-pv
spec:
capacity:
storage: 10Gi
volumeMode: Block
accessModes:
- ReadWriteOnce
storageClassName: local-storage # Reference Storage class
local:
path: /data/storage # Path where data is stored on Node
nodeAffinity:
required:
nodeSelectorTerms:
- matchExpressions:
- key: kubernetes.io/hostname
operator: In
values:
- <node-name>In above, It selects the Node where the local storage PV is created based on conditions
    apiVersion: v1
    kind: PersistentVolumeClaim
    metadata:
      name: my-pvc
    spec:
      accessModes:
      - ReadWriteOnce
      storageClassName: local-storage
      resources:
        requests:
storage: 1Gi apiVersion: apps/v1
kind: [Pod | Deployment | StatefulSet]
...
spec:
volumes:
- name: my-volume
persistentVolumeClaim:
claimName: my-pvcManages the deployment and scaling of a set of Pods, and provides guarantees about the ordering and uniqueness of these Pods.
Like a Deployment , a StatefulSet manages Pods that are based on an identical container spec. Unlike a Deployment, a StatefulSet maintains a sticky identity for each of their Pods. These pods are created from the same spec, but are not interchangeable: each has a persistent identifier that it maintains across any rescheduling.
StatefulSets are valuable for applications that require one or more of the following.
Access from Pod
apiVersion: v1 kind: ConfigMap metadata: name: app-settings labels: name: app-settings